Since this month is dedicated to mini, we decided to offer you a small section devoted to photos to put in the minis. The Mini, as its name indicates, is an album format reduces ... this can sometimes cause problems, because your photos, they are usually 9 x 10 x 13 or 15! Sometimes it is possible to cut them down to the desired format, but sometimes as often as the frame does not allow this and the only solution is to reduce the size of the photo, but how? Do not worry, every problem has its solution.
February is the "minibook" month is Scrap Go, And We Thought You Would Be interested in. Perhaps year article about resizing pictures. For a minibook, You Need small pictures, and leur Always Easy, Especially If You Can not or Do not want to cut and trim your pictures. The best thing to do IS resizing em, how to?
First comes a viable option if you print your pictures yourself. If you do not have image processing software like Photoshop, the easiest, well it's still using Word!
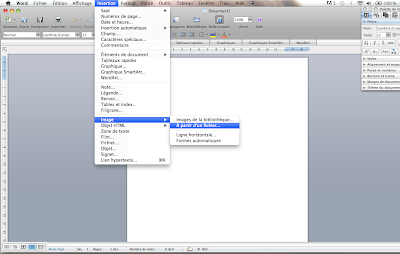
Open Word, choose "Insert", then in the dropdown "Image" and "From File" If you
print your pictures at home, The Easiest way to resize your pictures Is To use MS Word. Open Word, click on "Insert" in the top toolbar, choose "Picture" and "from file"
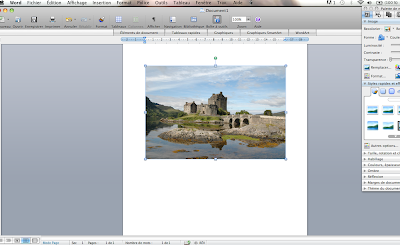
 You'll have access to files that are on your computer. Select the photo you want to reduce and double click on it, here on your page, with a small frame and benchmarks rounded corners.
 Select The Picture you wish to resize by Double Clicking on it. It Is Now On Your Page and it has a very convenient frame around it toggles With little in the Corners.

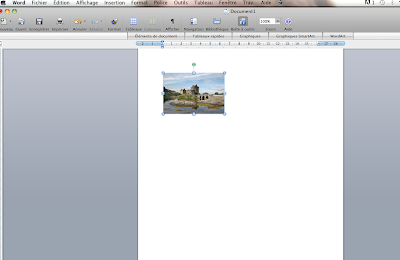
Place the cursor on one of these markers to reveal a rounded cross, click and moving the mouse towards the inside of the photo, you'll see them reduce the size of the photo (if you make a movement away from the center of the picture, you'll find that you can enlarge it.
Put The point is one Of The Corners Of The picture and you'll see a cross. Click, As If You Were The grabbing handle and drag Either Towards the Centre of the picture (to make it smaller), or Outside the picture (to make it bigger).

You can import multiple images and arrange them as you want on your page to optimize your page A4 photo paper. Consider using the small green circle that can rotate the picture!
You Can SEVERAL import pictures Them and arranges it so your page you make the Most of The Space is available year A4 photo paper page. Do not forget you-can rotate using The Picture The little green dot.
And if you do not print your own?
I've Got Two More hints for People Who Do not print at home, I'm Giving to The Links is for online printing companies in France, And The Photofiltre tutorial Is in French because I'm not sure year Français version Of The software exists .... sorry!
Some online development labs are starting to offer sizes 6 x 8 cm. This is the case My holiday photo and Auchan. I warn you, I have not tested services, I would point out just that they exist. If you have development experience with one of these brands, or if you know of others, please leave us a comment.
If you want to stick to your usual lab online, here's a trick to place 2 or 4 photos on a 10 x 15 that you then send to the lab as all your other photos.
To use this option, you will Photofiltre. Good news is free, bad news, it is only for PC ... not for Mac. Download Photofiltre
if you did not. Open the software and open with two photos. If you have a photo portrait and landscape orientation picture, they must have both the same orientation, make it rotate 90 degrees.
Click on the first and choose "Copy" (Ctrl C). Now click the second, and the Edit menu at the top, click Paste Special, then assemble the collage.

Photofiltre then asks if you want to put your picture up or down, right or left and once you have clicked, the assembly is done.

You have now a 10 x 15 cm fully recognized the lab, two photos 7.5 x 10. You will have a shot cutter to give when you receive your photos!
To put four small pictures on a 10 x 15 ... do the same thing. First put your pictures 1 and 2 on a 10 x 15, and repeat with your photos 3 and 4. Then repeat with the photo collage that contains the photos 1 and 2 and that containing photos 3 and 4.


0 comments:
Post a Comment